Detailed information
POS: Apply Enviso discount codes when selling tickets for Enviso offers
Exhibitions created in Recreatex and synced to Enviso can now be sold through the Recreatex POS with Enviso discount codes applied during the sale.
Initial setup
An exhibition configured in Recreatex and synchronised to Enviso as an Enviso offer.
Promotions (discount codes) created in Enviso.
The Recreatex counter plugin ReCreateX.CounterPlugin.Enviso enabled in the Recreatex POS module.
Example
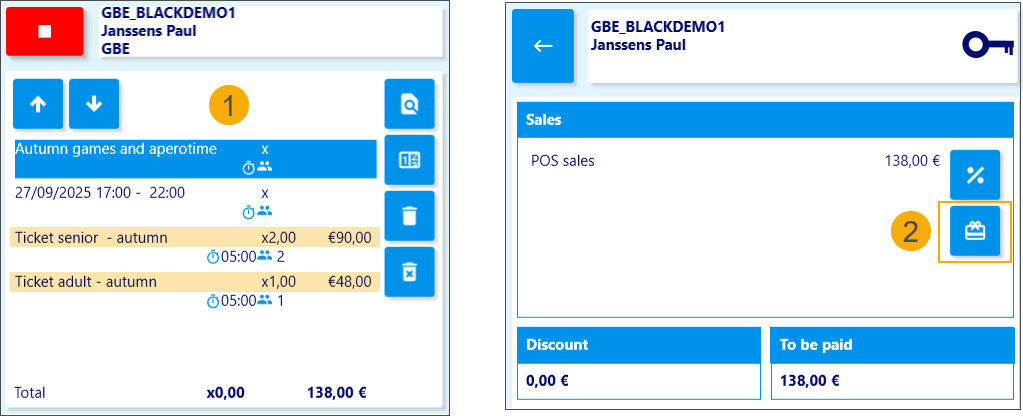
For our Enviso offer (exhibition) Autumn games and aperotime, two ticket types are available for sale via the Recreatex cash register:
Adult ticket: €48
Senior ticket: €45
We also have two Enviso discount codes possible for this event:
APERO25: Applies a 25% discount to the total basket price.
SENIOR5: Applies an additional €5 discount per senior ticket.
Additionally, we have created a Recreatex discount code named APERO25 intended exclusively for additional Recreatex articles added at the cash register during the ticket purchase process.
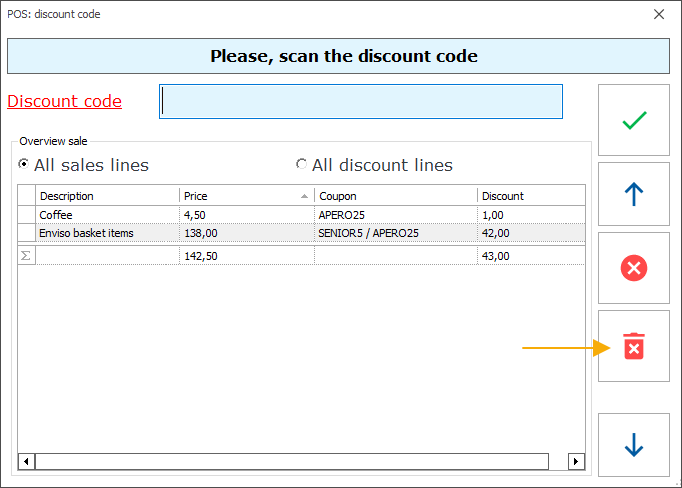
Our basket includes 1 adult ticket and 2 senior tickets. These are Enviso items (1), so the Enviso discount codes can be applied. The cashier clicks the discount code icon (2) to open the discount code screen.
On the discount code screen, the cashier enters APERO25 (3) and applies the discount code by pressing the Tab key. The sales line updates to show the original price, the discount code name, and the discount amount (4).
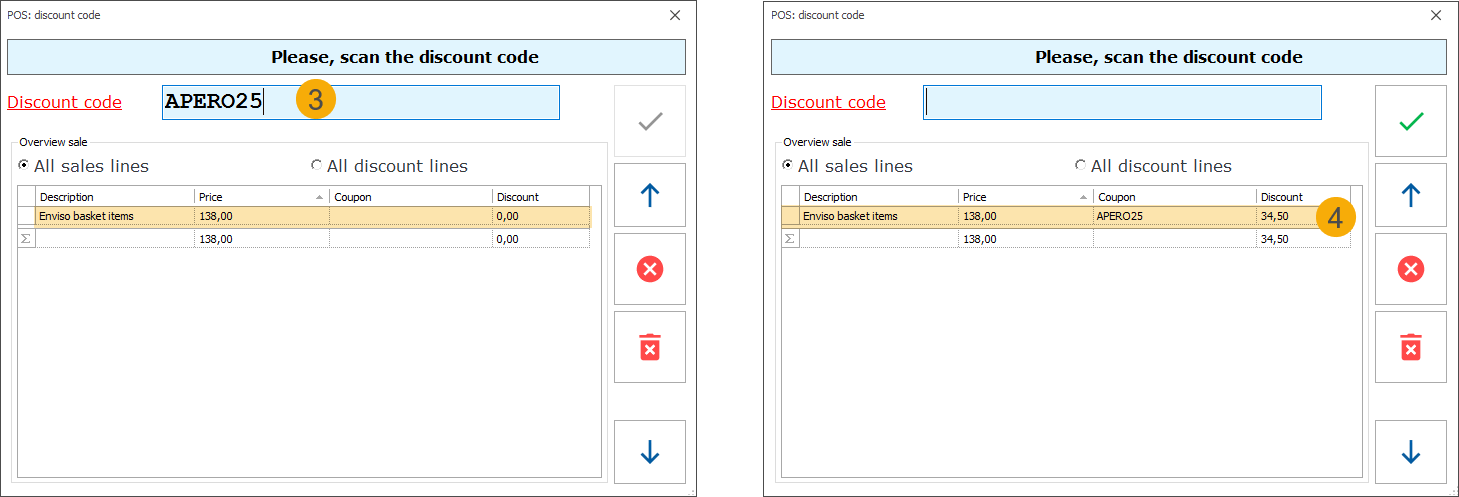
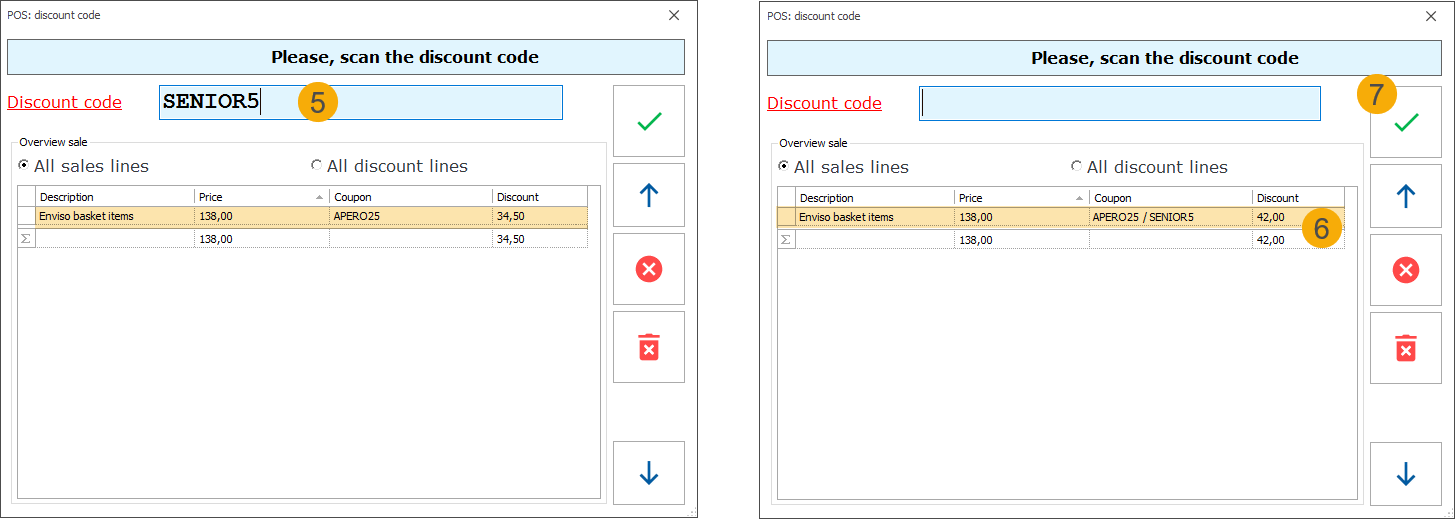
The same steps are followed to apply the second code, SENIOR5 (5). Once the discount codes are applied, the screen displays both coupon names and the updated total discount amount (6). The cashier clicks the green checkmark (7) to confirm the selection and return to the main screen.
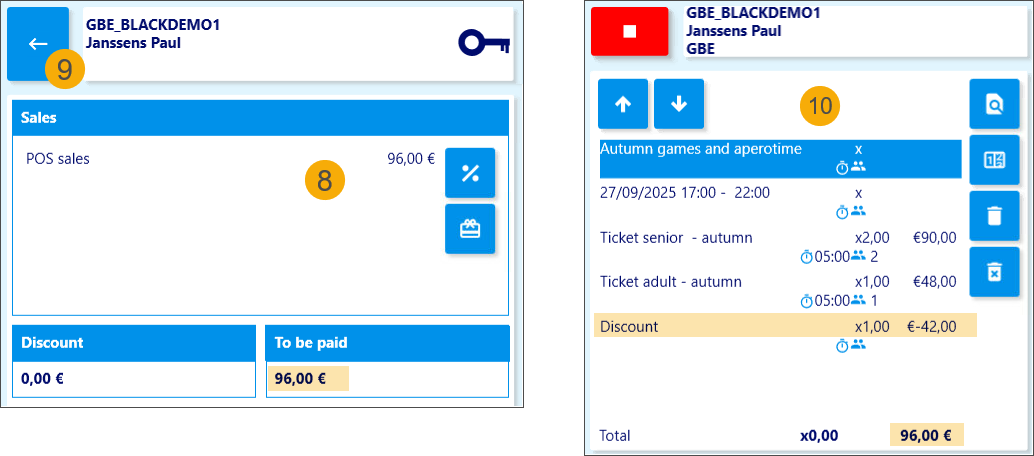
The total amount to be paid now reflects the applied discounts (8). By navigating back to the basket using the blue arrow (9), the cashier can view the original prices and the total discount amount (10).
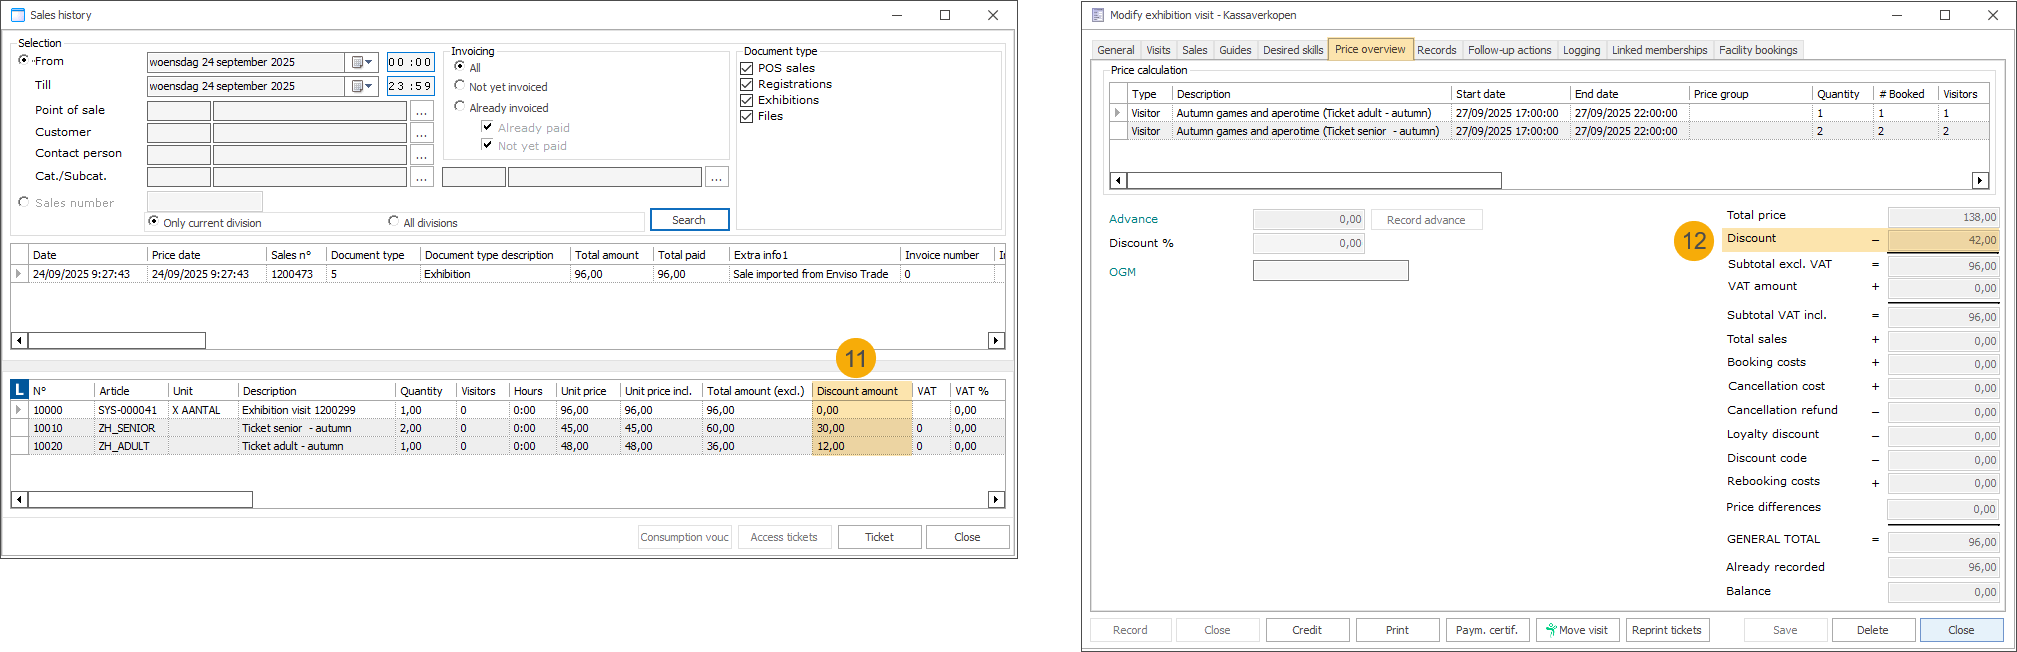
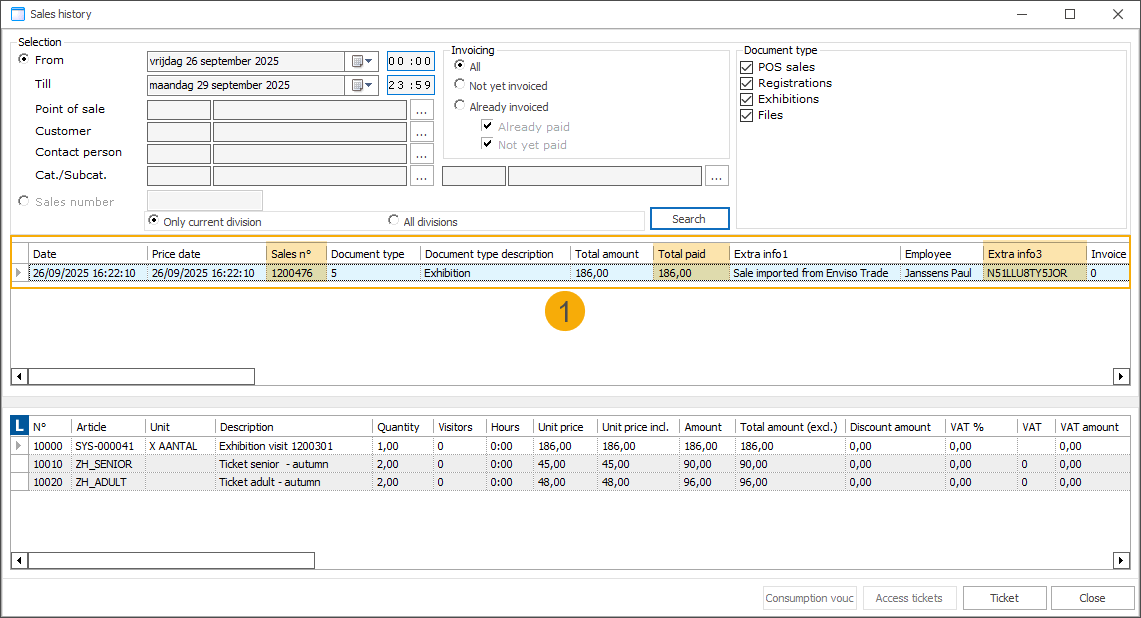
Once the payment is completed, the applied discounts are visualised in the sales history (11) and in the price overview of the exhibition visit (12) in the Recreatex backoffice.
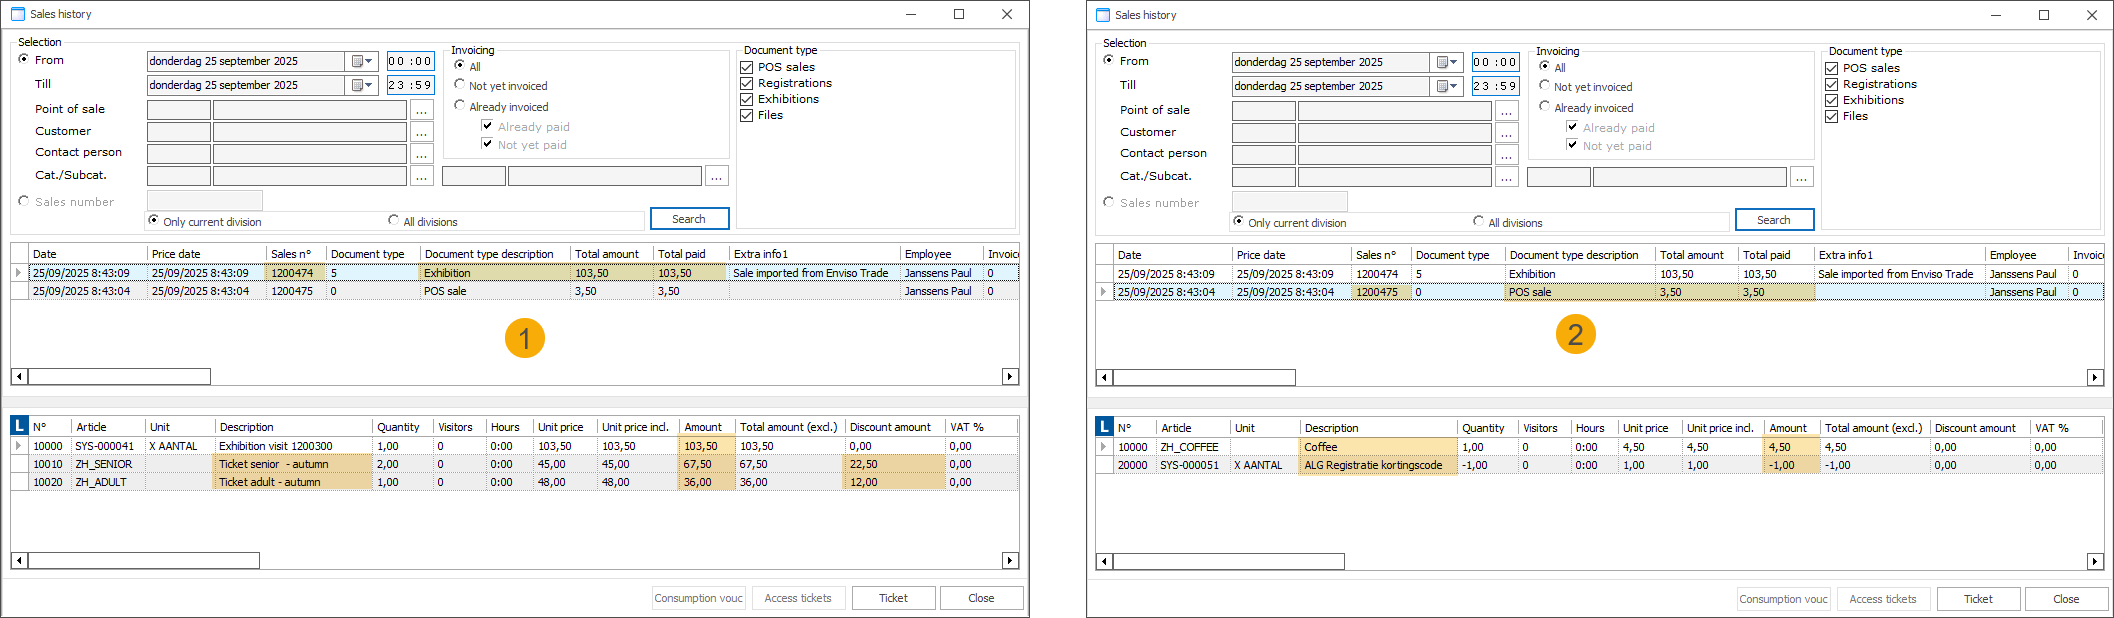
If a discount code with the same name exists in both systems, it can be applied in the same way as described above. In our example, the discount code APERO25 was used, applying a 25% discount to the Enviso portion of the basket (1), and a Recreatex discount code with the same name provided a €1 discount on Recreatex items (2).
The system automatically checks the basket and applies each discount to the relevant items: the Enviso discount to Enviso products (3), and the Recreatex discount to Recreatex articles (4).

When discount codes from both Enviso and Recreatex are applied in a single transaction, the Recreatex sales history will show two separate sales lines: one for the Enviso exhibition tickets (1) and one for the Recreatex articles (2), each with its respective discount applied.
Individual Enviso discounts cannot be deleted. If a discount was applied by mistake, pressing the red trashcan button will remove all applied codes. You will then need to reapply only the discount codes you want to use.
POS: Handle Enviso "pay later" ticket orders at Recreatex POS
You can now retrieve and pay for Enviso "pay later" ticket orders directly at the Recreatex POS using a new extra function. Upon successful payment, the sale is automatically registered in Recreatex, and the order is confirmed in Enviso.
Initial setup
An exhibition configured in Recreatex and synchronised to Enviso as an Enviso offer.
The Pay later option must be enabled on the Enviso offer.
The Recreatex counter plugin ReCreateX.CounterPlugin.Enviso enabled in the Recreatex POS module.
Example
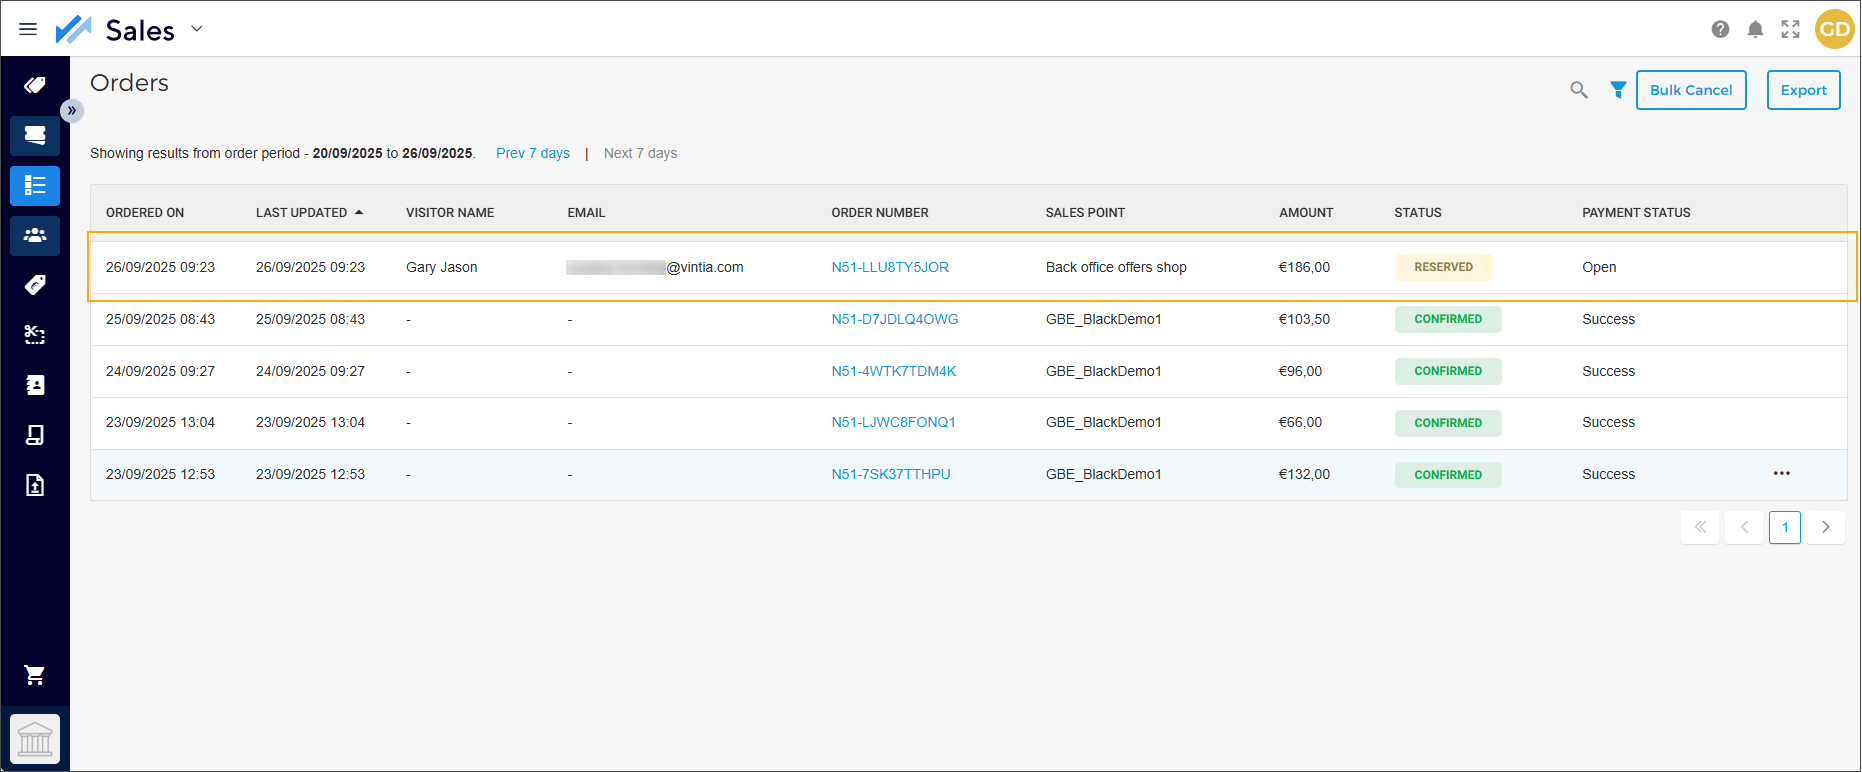
We have activated the Pay later option on our Enviso offer Autumn games and aperotime, and booked tickets via the Offers Shop. In Enviso, the order now has the status reserved, with the payment status set to open.
In Recreatex POS, the cashier navigates to extra functions  and clicks the button
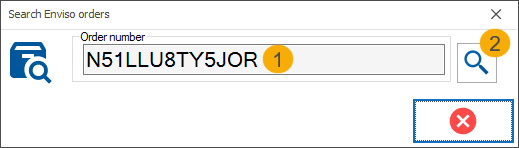
  (Scan Enviso order number). A pop-up appears where the cashier can either scan the Enviso order number (if a scanner is available) or type it manually (1), press Tab and then click the search icon (2) to load the order into the POS basket.
Valid order is automatically loaded into the POS basket. (1)
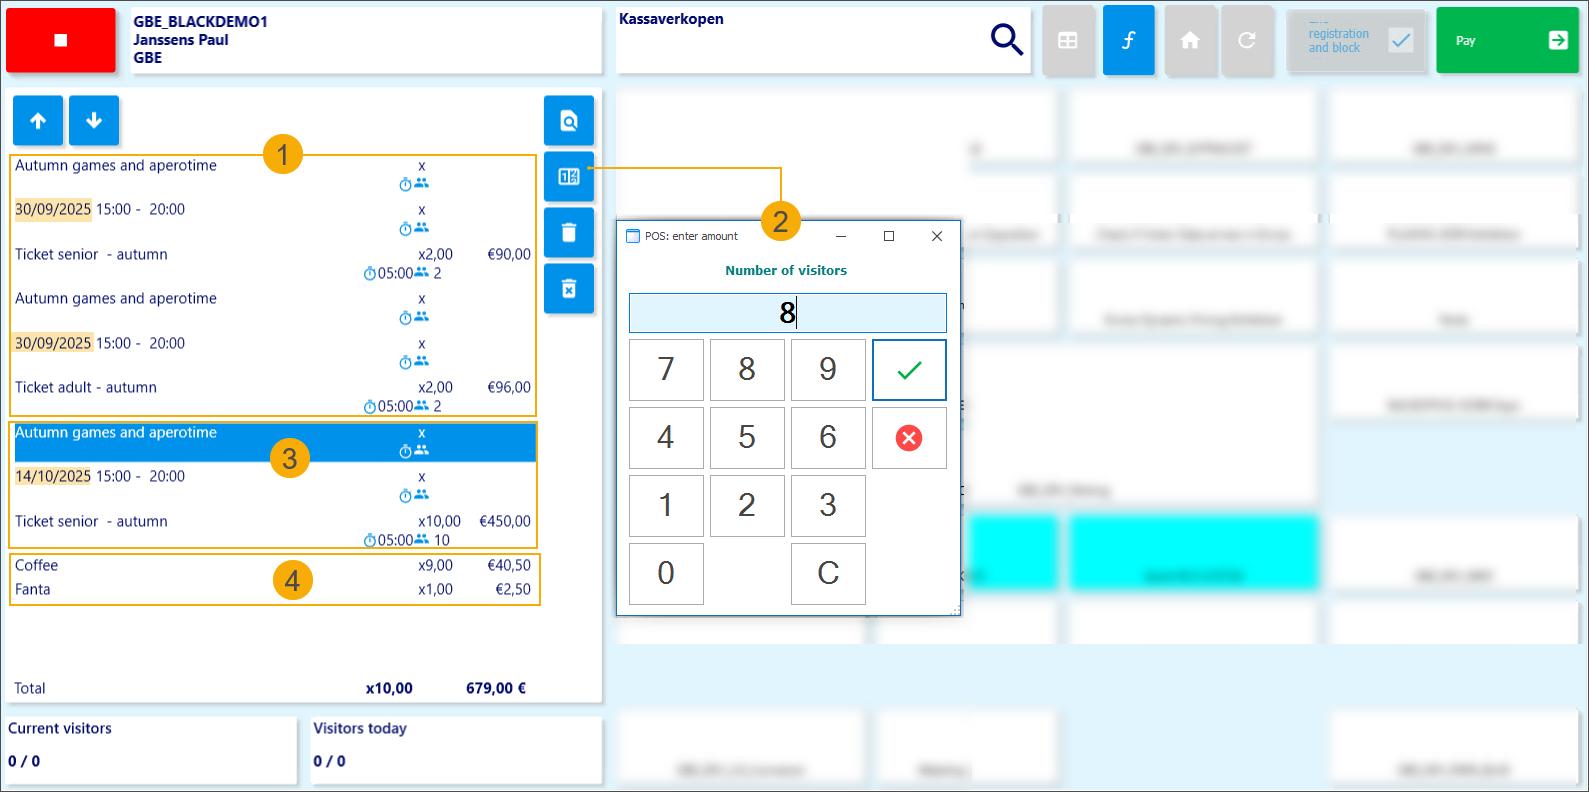
The cashier can adjust the ticket quantity. (2)
The system checks pricing and capacity to validate the change. If the adjustment is not possible, the quantity will automatically revert to its previous value.
The cashier can add multiple Enviso "pay later" ticket orders. (3)
The cashier can add Recreatex articles to the same basket with Enviso "pay later" ticket orders. (4)
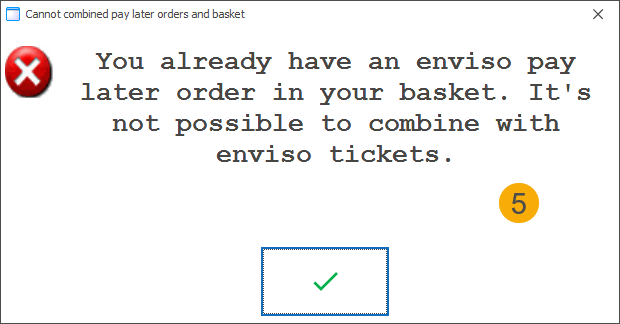
It is not possible to combine an Enviso "pay later" ticket order with the purchase of Enviso exhibition tickets at the POS in a single transaction. (5)
Invalid orders cannot be retrieved at the POS.
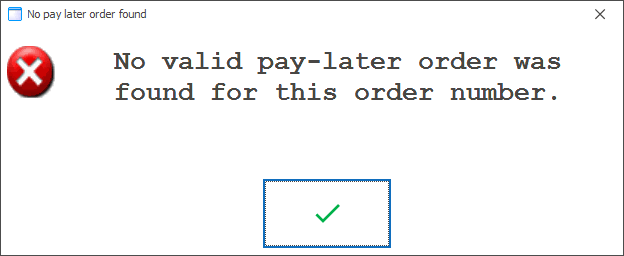
This includes orders with a past visit date, orders past the cut-off time, or orders with a status other than reserved.
The system displays an error message when an invalid order is entered.
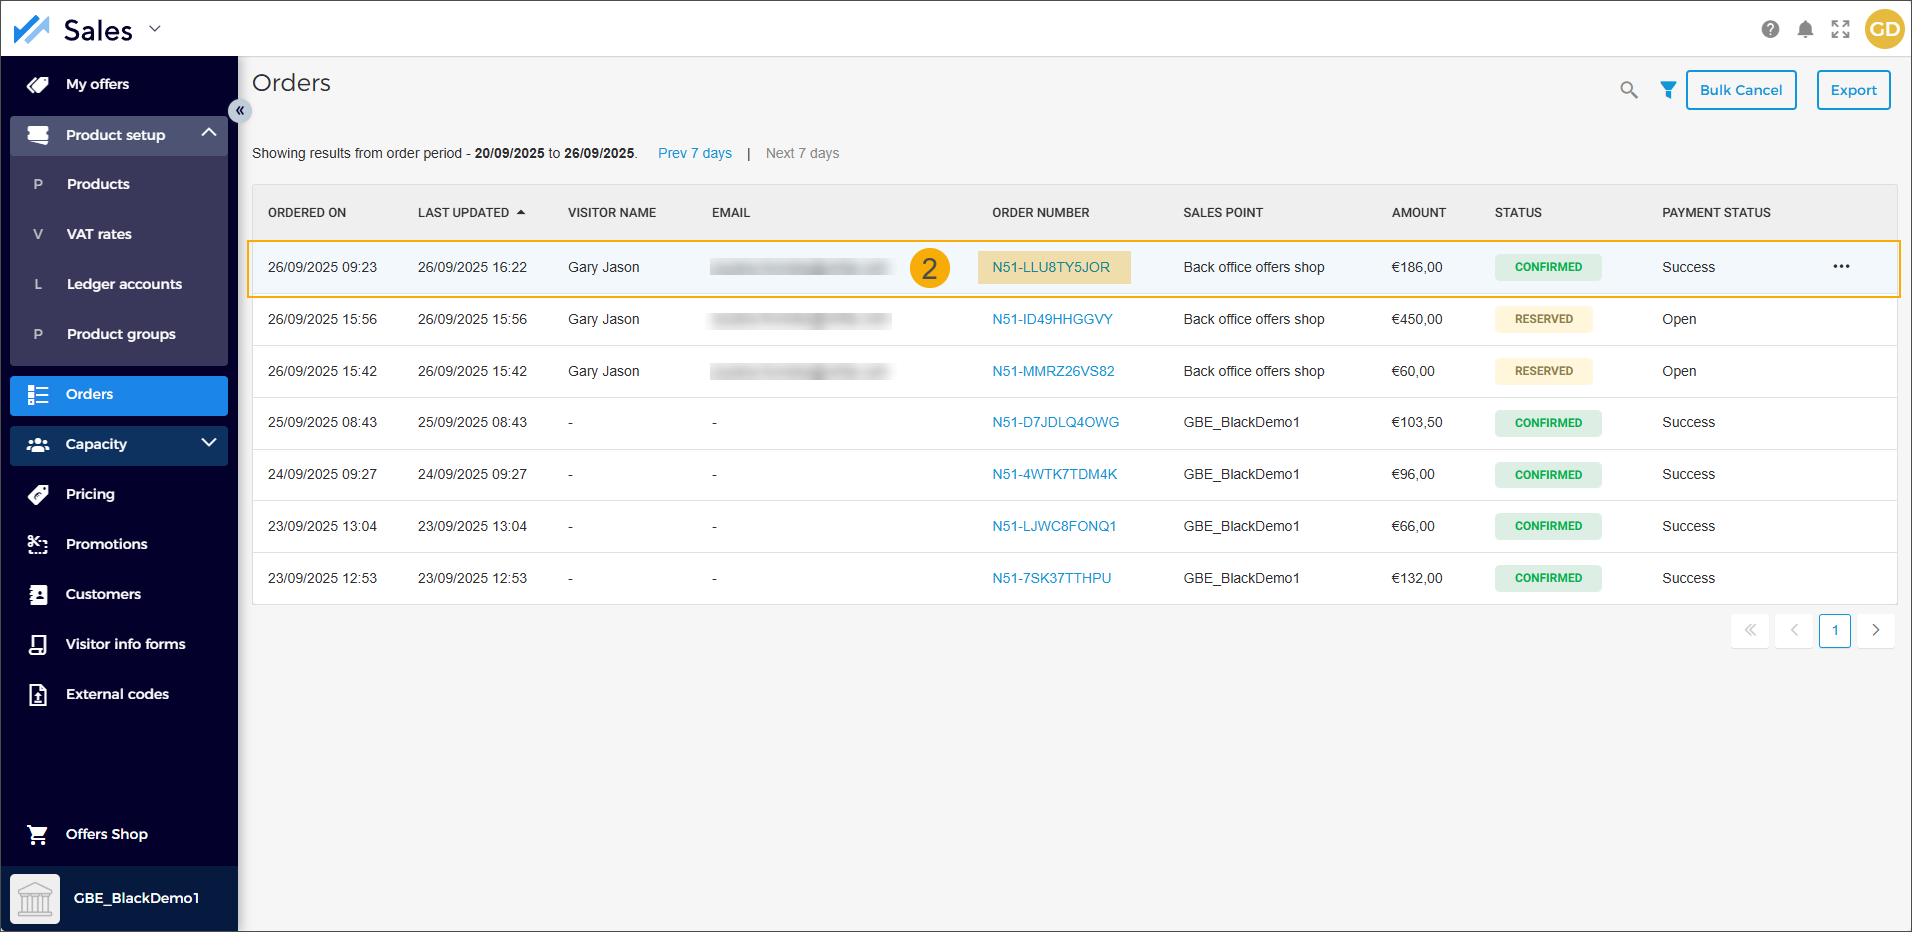
To complete the transaction, the cashier follows the regular POS payment flow. Once the payment is successful, Recreatex automatically registers the sale (1) and confirms the order in Enviso (2).
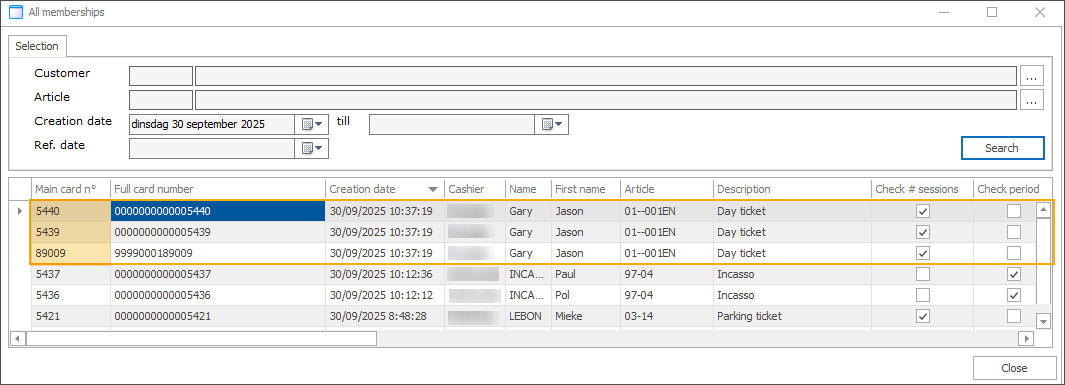
POS: Add tickets and memberships to existing customer cards
When purchasing exhibition tickets, memberships or registering for activities at the POS, the system generates card numbers automatically. With the new feature, cashiers can now scan or enter an existing customer card to replace the suggested number, allowing tickets to be added to a card the customer already has.
This flexibility allows customers to purchase multiple tickets, assigning them to existing customer cards where available, while letting the system automatically generate barcoded tickets for guests without a card.
This POS functionality supports the processing of tickets and memberships originating from the following modules:
General - tickets/memberships sold independently
Exhibitions - exhibition tickets
Activities - activity registrations using a registration article to generate an access ticket
Configuration
The membership article used must have the following configuration:
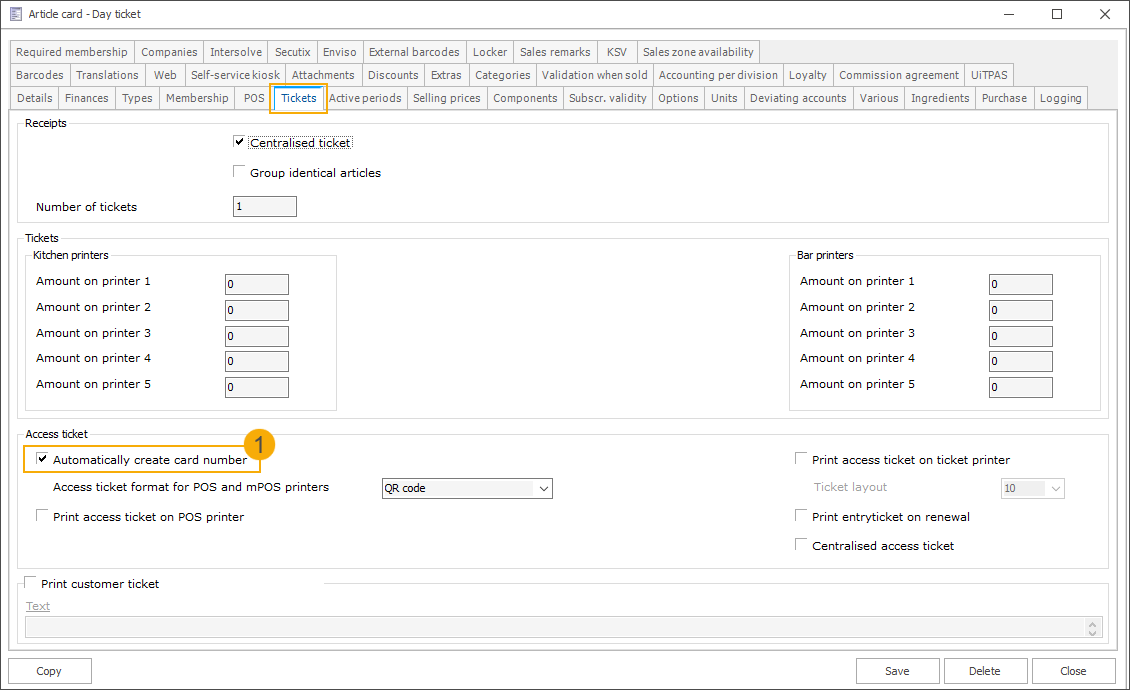
Activate the setting Automatically create card number (1) on the article card under the tab Tickets.
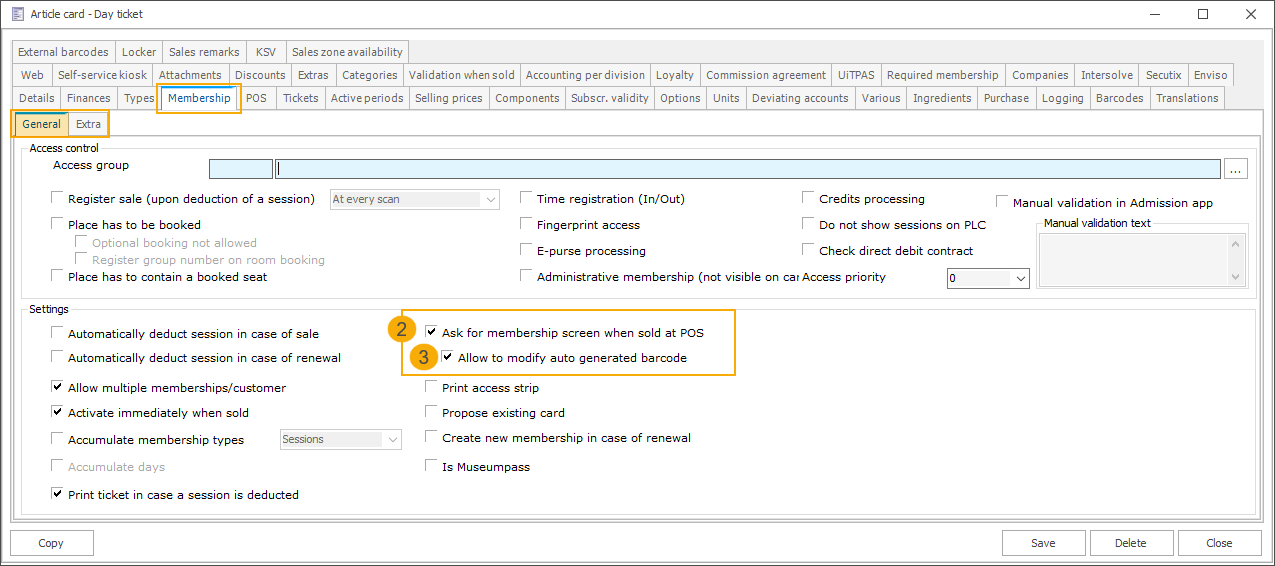
Then, go to the tab Membership > General where the option Ask for membership screen when sold at POS (2) is now available and can be activated.
Once this setting is enabled, the new sub-setting Allow to modify auto-generated barcode (3) can also be activated. With this option, the card number field at the POS becomes editable, allowing the cashier to replace the proposed card number with an existing customer card.
Further, ensure that the card definition (SydAdmin) used to auto-generate card numbers is set up using one of these options:
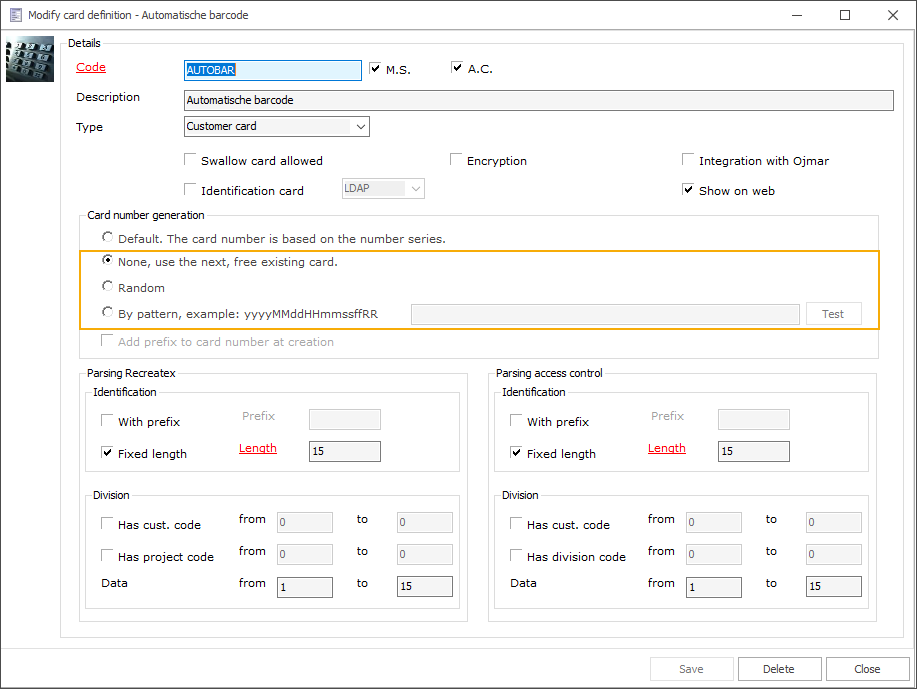
Important
Manual modification of the card number is not supported for card definitions based on a number series, as number series cannot be reset. If a number series card definition is used, the card number field remains read-only, even if Allow to modify auto-generated barcode is enabled.
How it works
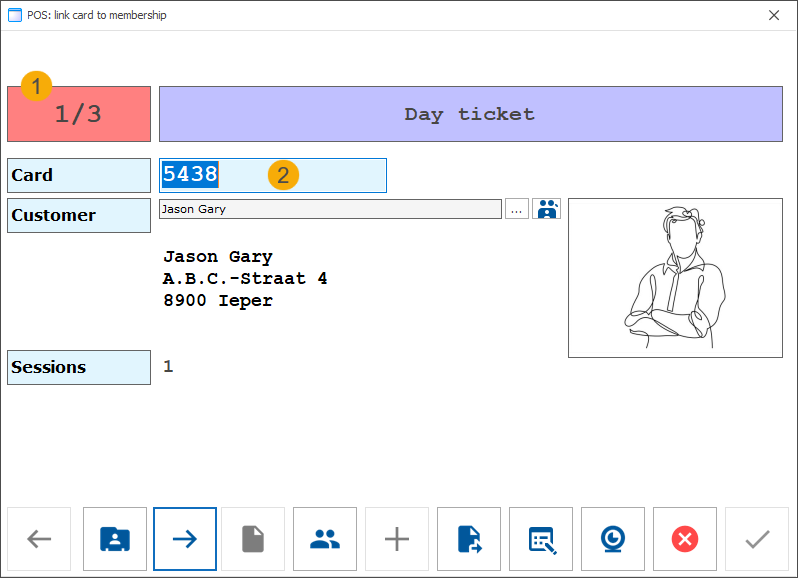
In this example, the customer has purchased three tickets. After pressing the Pay button to complete the transaction, the system generates three tickets, each with an automatically assigned card number, and opens the Link card to membership screen.
We now see the first ticket (1) displayed, along with a suggested card number (2). This number is editable.
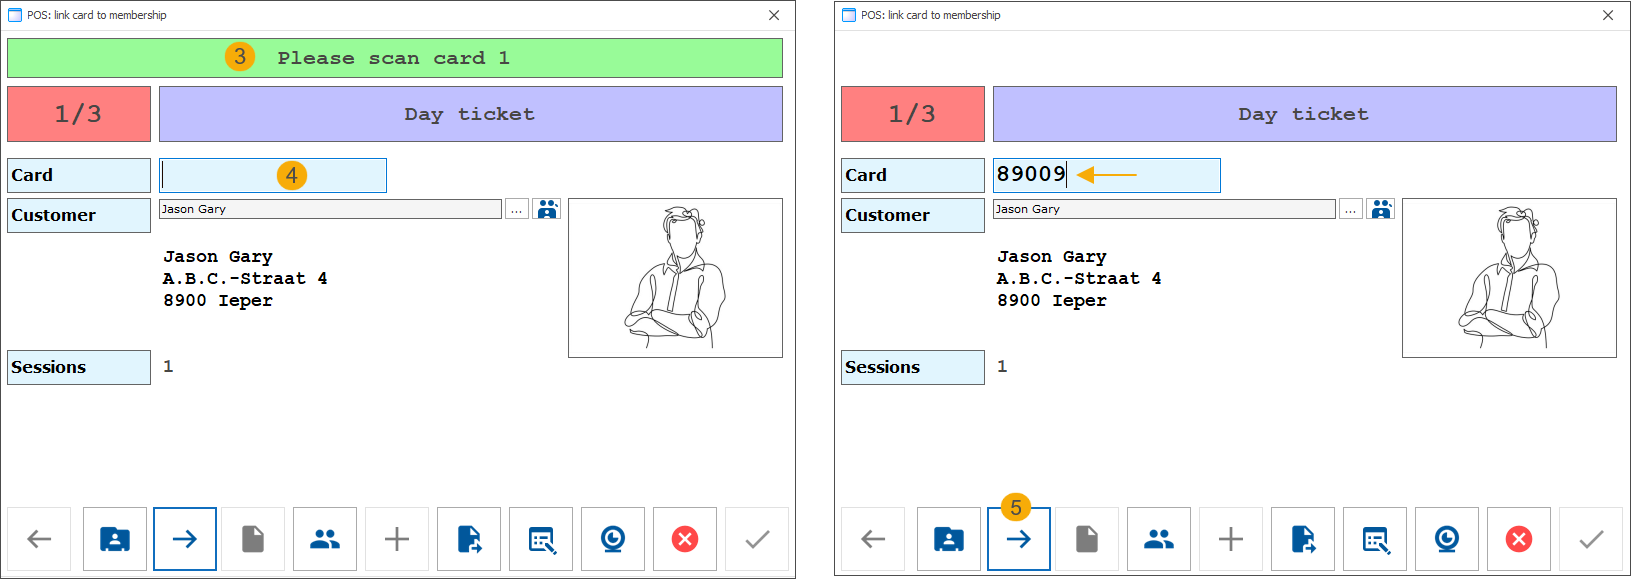
The customer requests to use their existing card (number 89009). The cashier either scans the card (3) or enters the card number manually (4). The system verifies whether the entered card number is linked to the currently selected customer.
The cashier then proceeds to the next ticket (5).
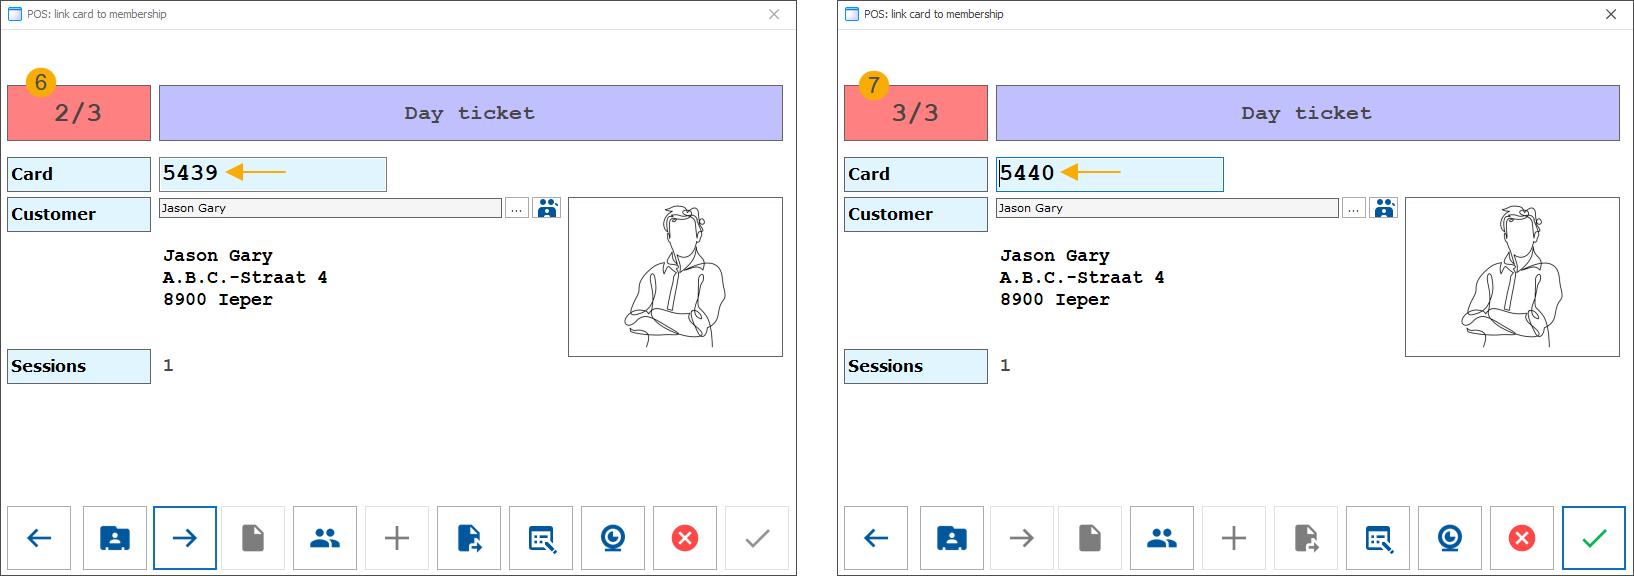
For the second and third tickets, the cashier accepts the auto-generated card numbers without changes.
In Recreatex backoffice, we can now see one ticket linked to the customer’s existing card and two tickets assigned to auto-generated card numbers.
Note
If an auto-generated card number is not used because the ticket or membership is linked to an existing customer card instead, it will be reused during a future sale when a new card number is required.
This helps prevent gaps in card numbering and reduces the number of unused cards in the system.
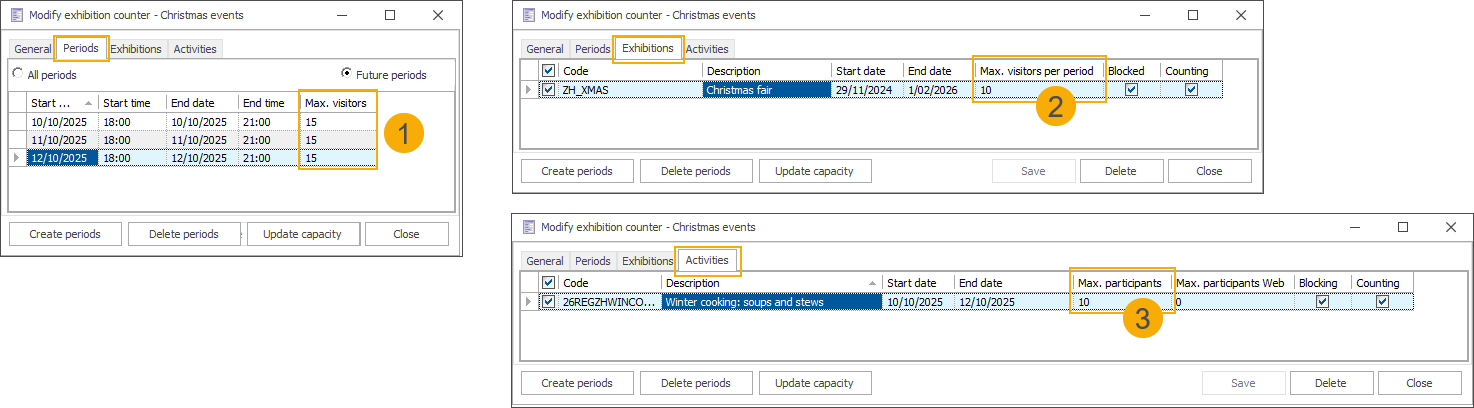
Use exhibition counters to track activity registrations
To improve coordination and visitor management across modules, we have extended the counter functionality to include the Activities module. This means counters previously used for exhibitions can now also incorporate activities, allowing both to be tracked within the same counter.
This enhancement enables organisers to monitor attendance across exhibitions and activities held in the same location and time slot using a shared counter system. It supports accurate capacity tracking and helps prevent overbooking.
The exhibition counter logic remains unchanged. The Activities module now includes a full implementation of counter-based validation, including capacity checks and registration logic.
Configuration
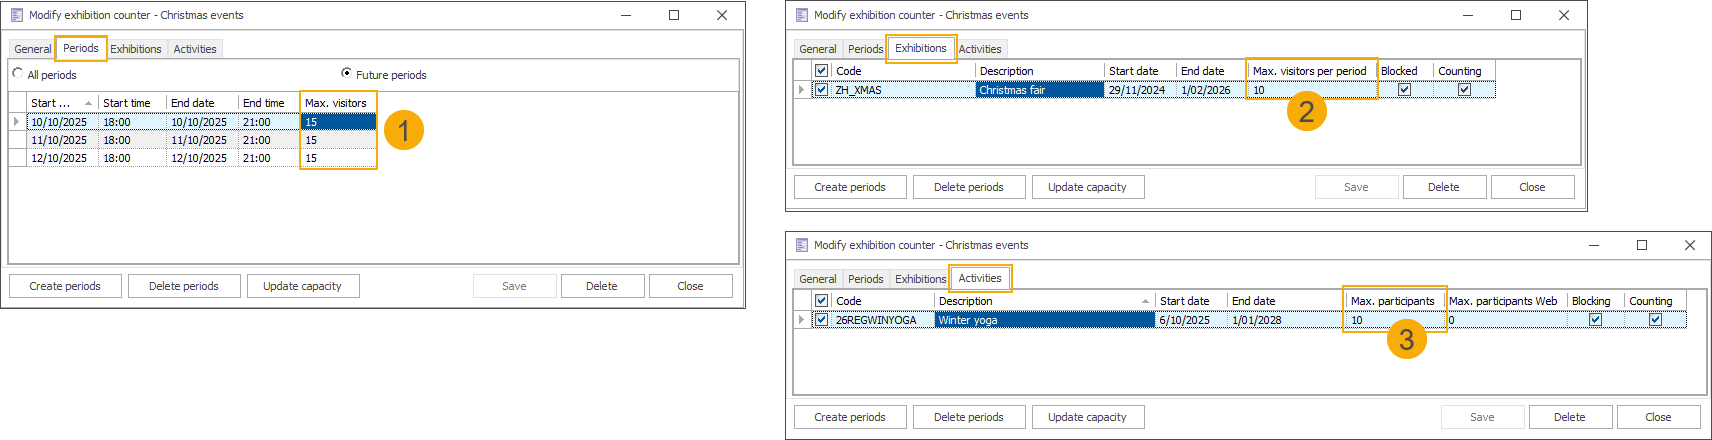
In Timeslot ticketing > Settings > Counters, open the exhibition counter you want to use for an activity. In addition to the Exhibitions tab, there is now a new Activities tab that lists all currently available activities.
Select an activity to link to this counter. All counter functionalities available for exhibitions can now also be applied to activities in the same way.
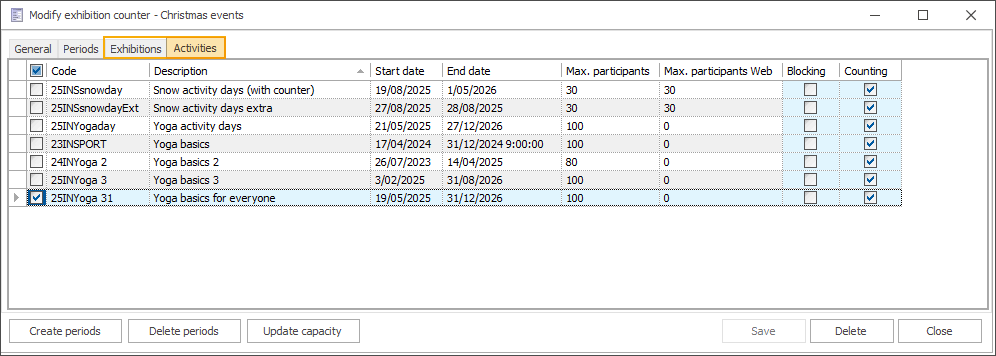
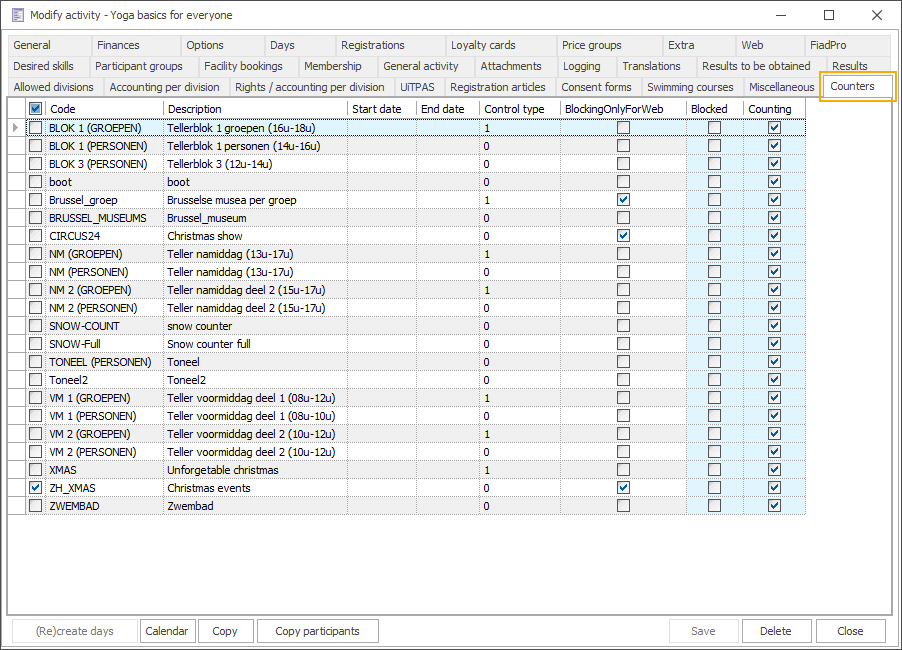
In the Activities module, open the relevant activity. You will now see an additional Counter tab, where you can activate or deactivate counters for that specific activity.
For a detailed explanation of counters, see Counters.
Registering at the activity level
The counter is considered full when any of the periods associated with the activity reaches its maximum capacity. Counter checks are applied at the activity level, not on individual days.
Note
The counter takes into account activity registrations with the status Booked temporarily and Booked.
Registrations with the status Cancelled or On waiting list are not included in the calculation.
Selecting an activity with any of the available periods full triggers a message asking whether the customer would like to join the waiting list.
Changing the number of participants in the basket triggers a check of the overall counter capacity.
If the counters are full, a blocking message appears, and the number of visitors is reverted to the previous value.
When counters are full, the following actions trigger a message informing the customer that the registration will be placed on the waiting list:
Changing the total number of participants
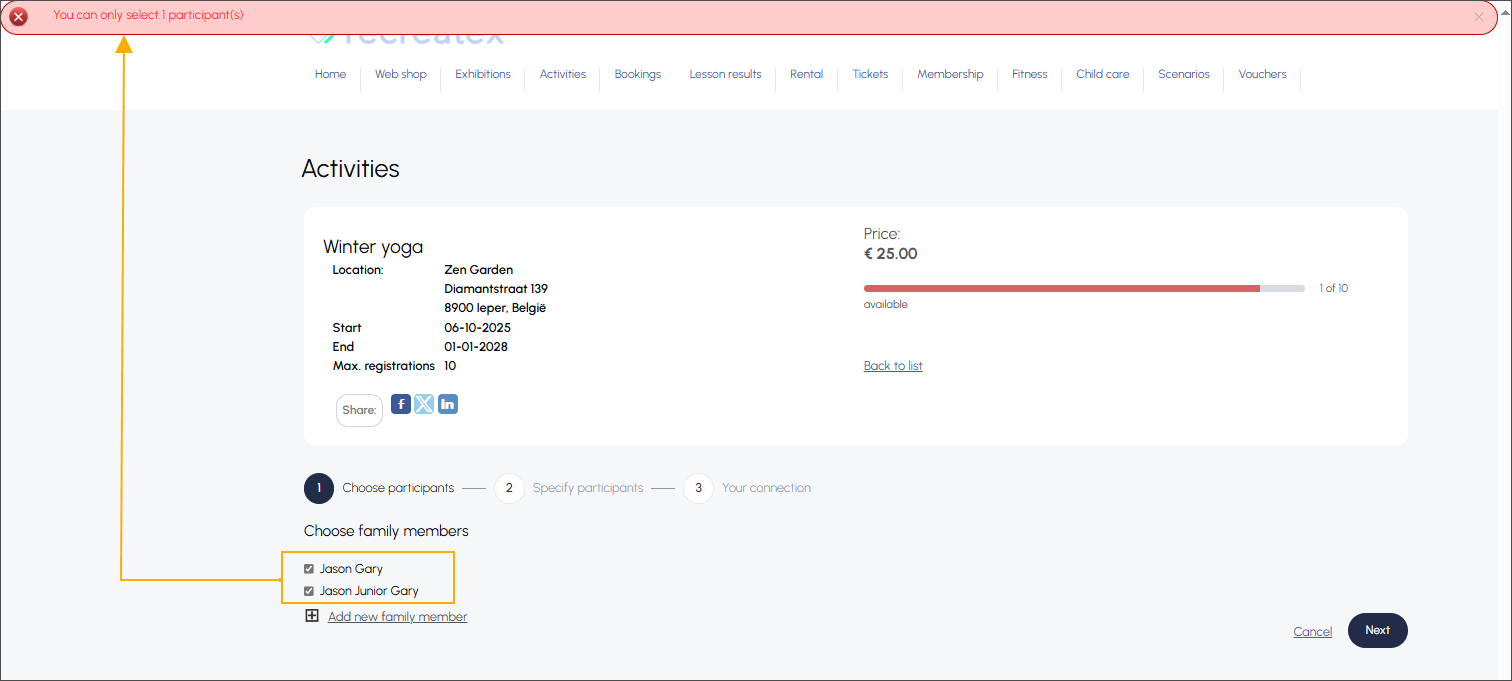
Adding family members
Changing the status to Booked
Selecting or changing an activity
The following actions trigger a message that reverts the value to the previous one:
Changing the number of participants when modifying the participant's registration
A check is performed immediately after changing the number, once you navigate away from the field (before Save button is activated).
A check is also performed when clicking Save (e.g. if the button was already active due to other changes).
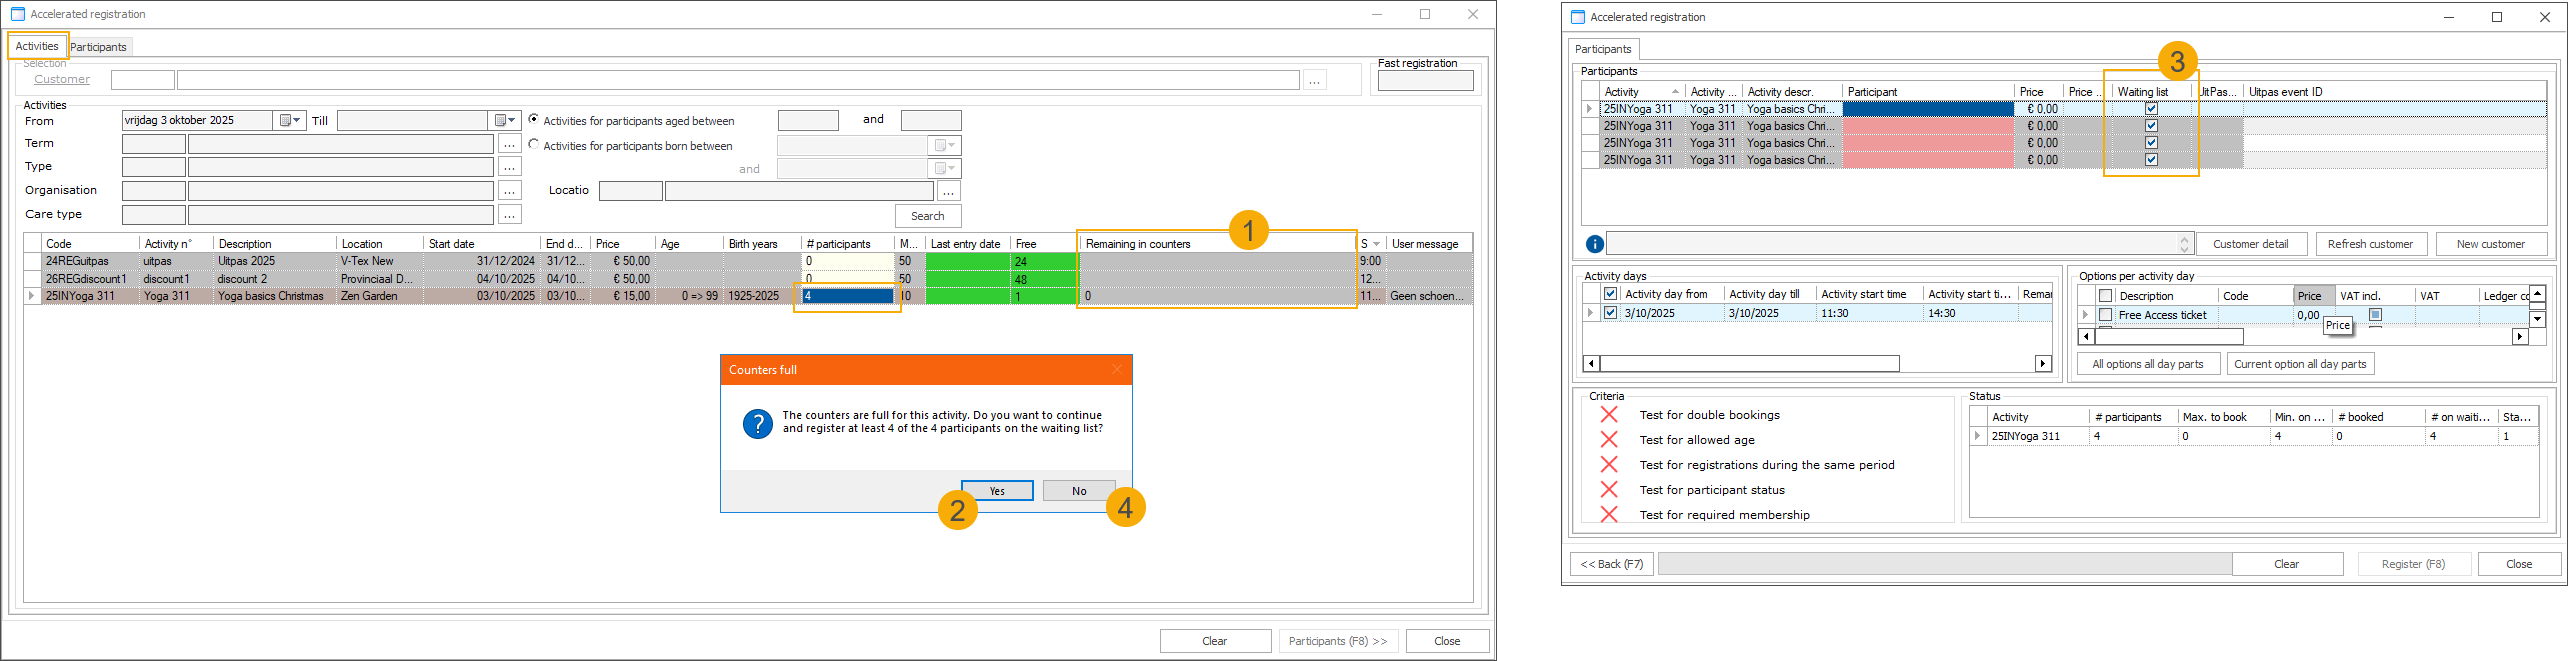
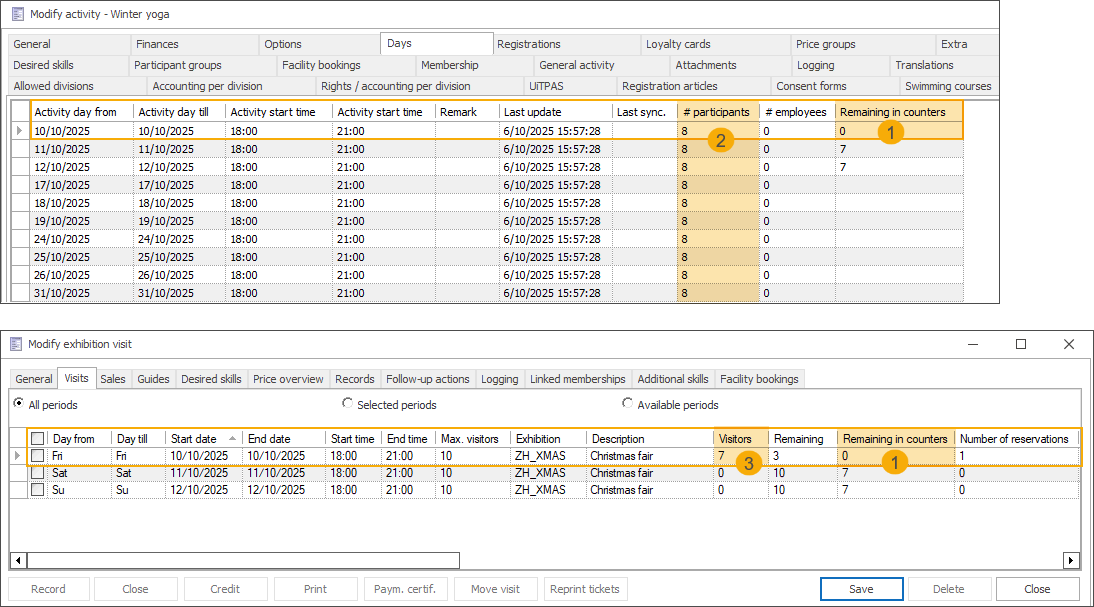
A new column Remaining in counters (1) has been added to the table under Activities
When changing #Participants beyond capacity, a message appears asking whether any participants should be placed on the waiting list.
Clicking Yes (2) places participants exceeding the capacity on the waiting list (3)
Clicking No (4) reverts the number to its previous value.
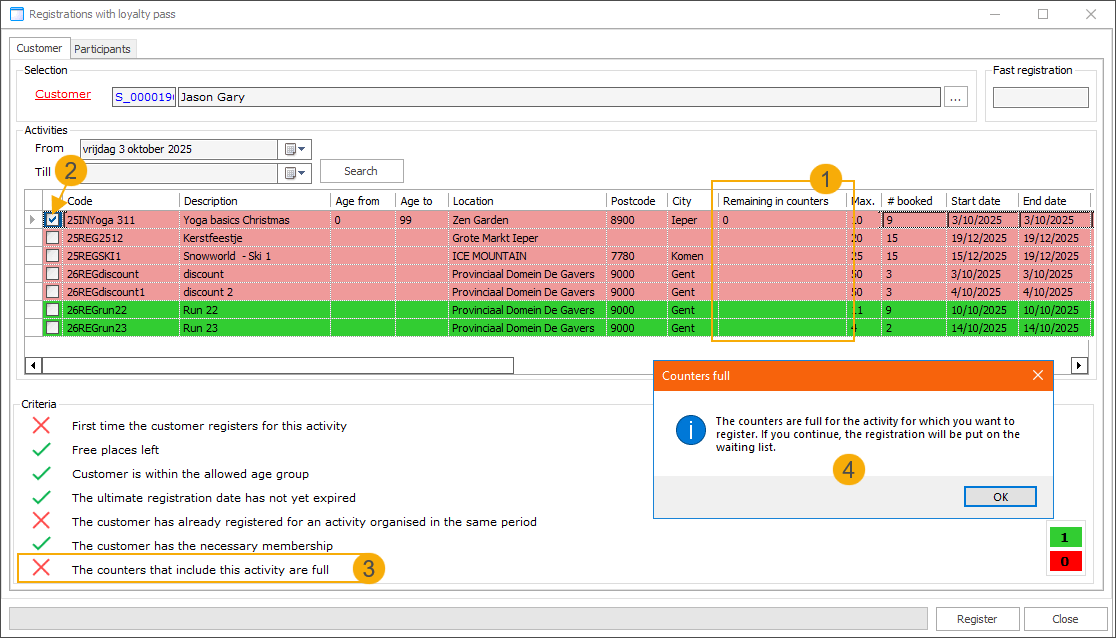
A new column Remaining in counters (1) has been added to the table under Activities
Selecting an activity (2) triggers the counter validation.
New validation criterion: Counters that include this activity are full (3).
If counters are full, a message appears informing that continuing will place the registration on the waiting list (4).
Registering at the activity day level
Counter checks apply to specific activity days or day parts.
Note
The counter takes into account activity registrations with the status Booked temporarily and Booked.
Registrations with the status Cancelled or On waiting list are not included in the calculation.
The remaining number of participants on the activity day selection screen is based on counters, not actual activity capacity.
Selecting a full activity day (i.e. when the counter is full) triggers a message asking whether the customer would like to join the waiting list.
If the counter is full, changing the number of participants for an activity day already in the basket triggers an error, and the number cannot be modified.
When counters are full for any of the selected activity days, the following actions trigger a message informing the customer that the registration will be placed on the waiting list:
Changing the total number of participants
Selecting or changing an activity
Changing the registration status to Booked triggers a counter check for all selected activity days. If capacity is insufficient, the status is reverted to On waiting list.
When adding an activity day to a registration:
If the status is On waiting list, no check on counter capacity is performed.
For all other statuses, each selected day is checked. If the counter is full, an error is displayed, and registration for that day is not allowed.
Modifying the Number field value in participant registration is not supported for registrations at the activity day level.
Counter capacity checks are not performed when changing the value.
Counter capacity checks are also not performed upon saving.
Registration is blocked when counters are full:
Changing an activity triggers an error if all activity days are full, and no registration is possible for this activity.
Selecting an activity day part triggers an error, and registration is not allowed for that day part.
Selecting an activity day and clicking Search triggers a counter check. If the day part is full, an error is displayed and registration is not allowed.
Clicking Execute triggers a counter check. If the selected day part is full, an error is displayed and registration is not allowed.
Webshop: Use exhibition counters to track activity registrations
The exhibition counters feature has been extended to include activity registrations made via the Recreatex webshop. This means that registrations submitted through the webshop’s Activities module are now taken into account when calculating counter limits.
Counters can be configured for:
activities only
combination of exhibitions and activities
This enables flexible capacity management across various types of offerings, whether you are selling activity registrations alone or combining them with exhibition tickets.
Configuration
Counters are configured in the Recreatex backoffice. For a comprehensive overview of how counters function and how to set them up, refer to Counters.
Details on how to include activities in exhibition counters can be found in the previous topic.
No configuration is required on the webshop side.
Registering at the activity level
If any linked activity day is a part of a full counter, the entire activity is considered fully booked.
The number of available places for an activity is the lowest of the following values:
The maximum number of participants set for the activity
The remaining places on the linked counter(s)
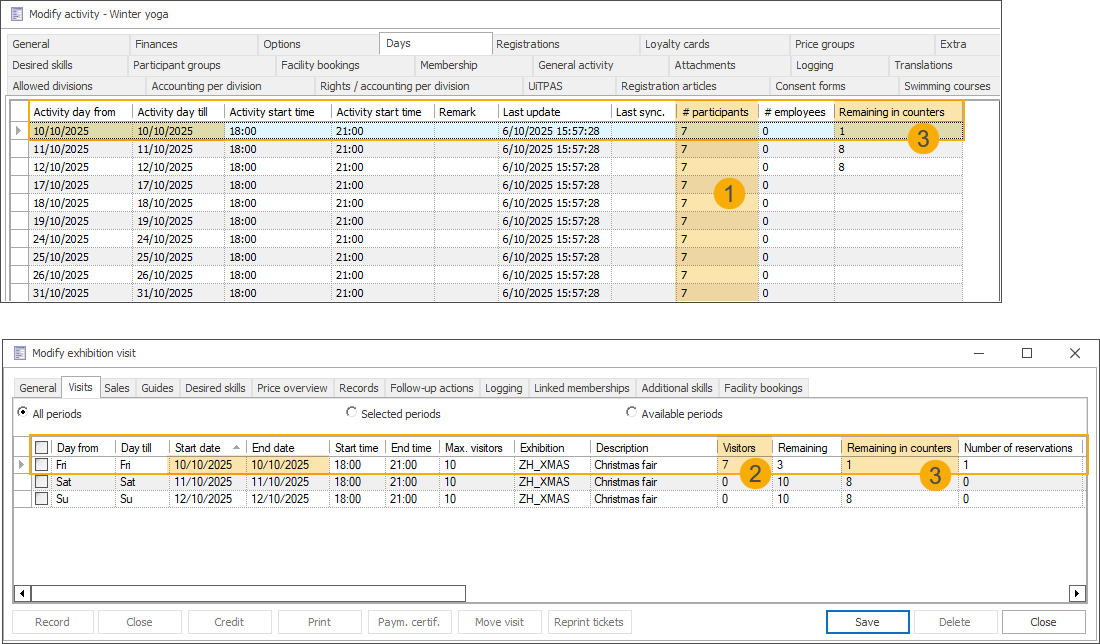
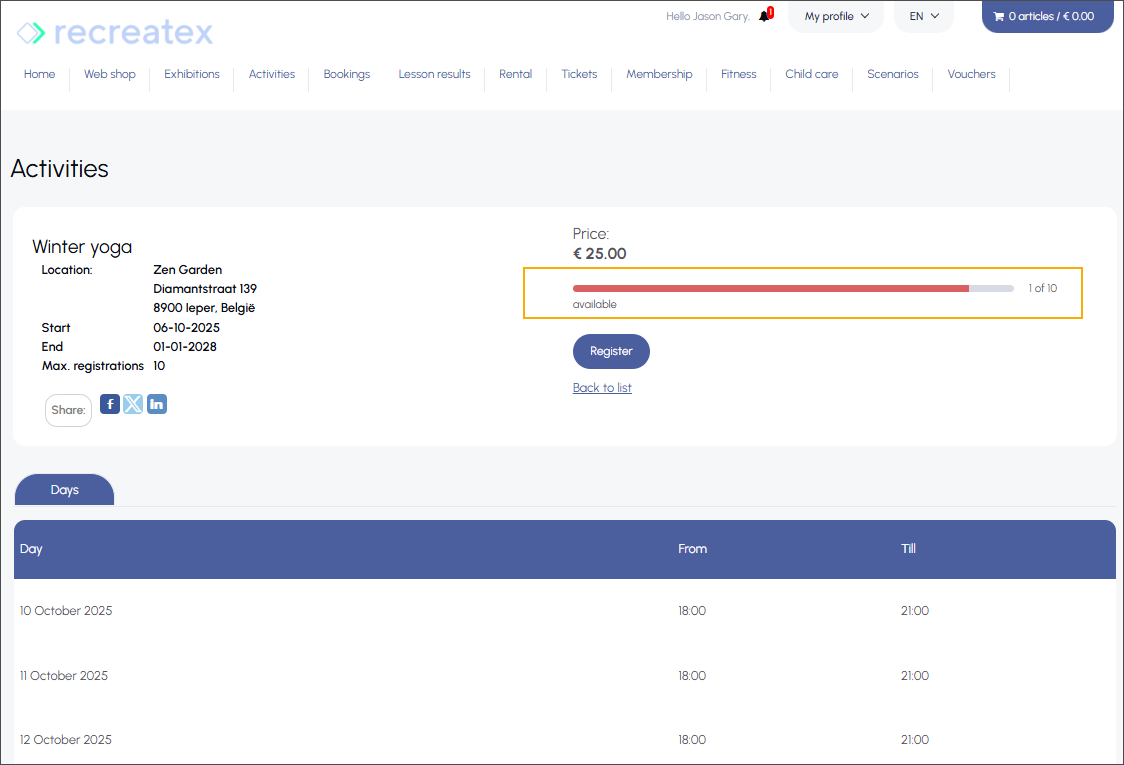
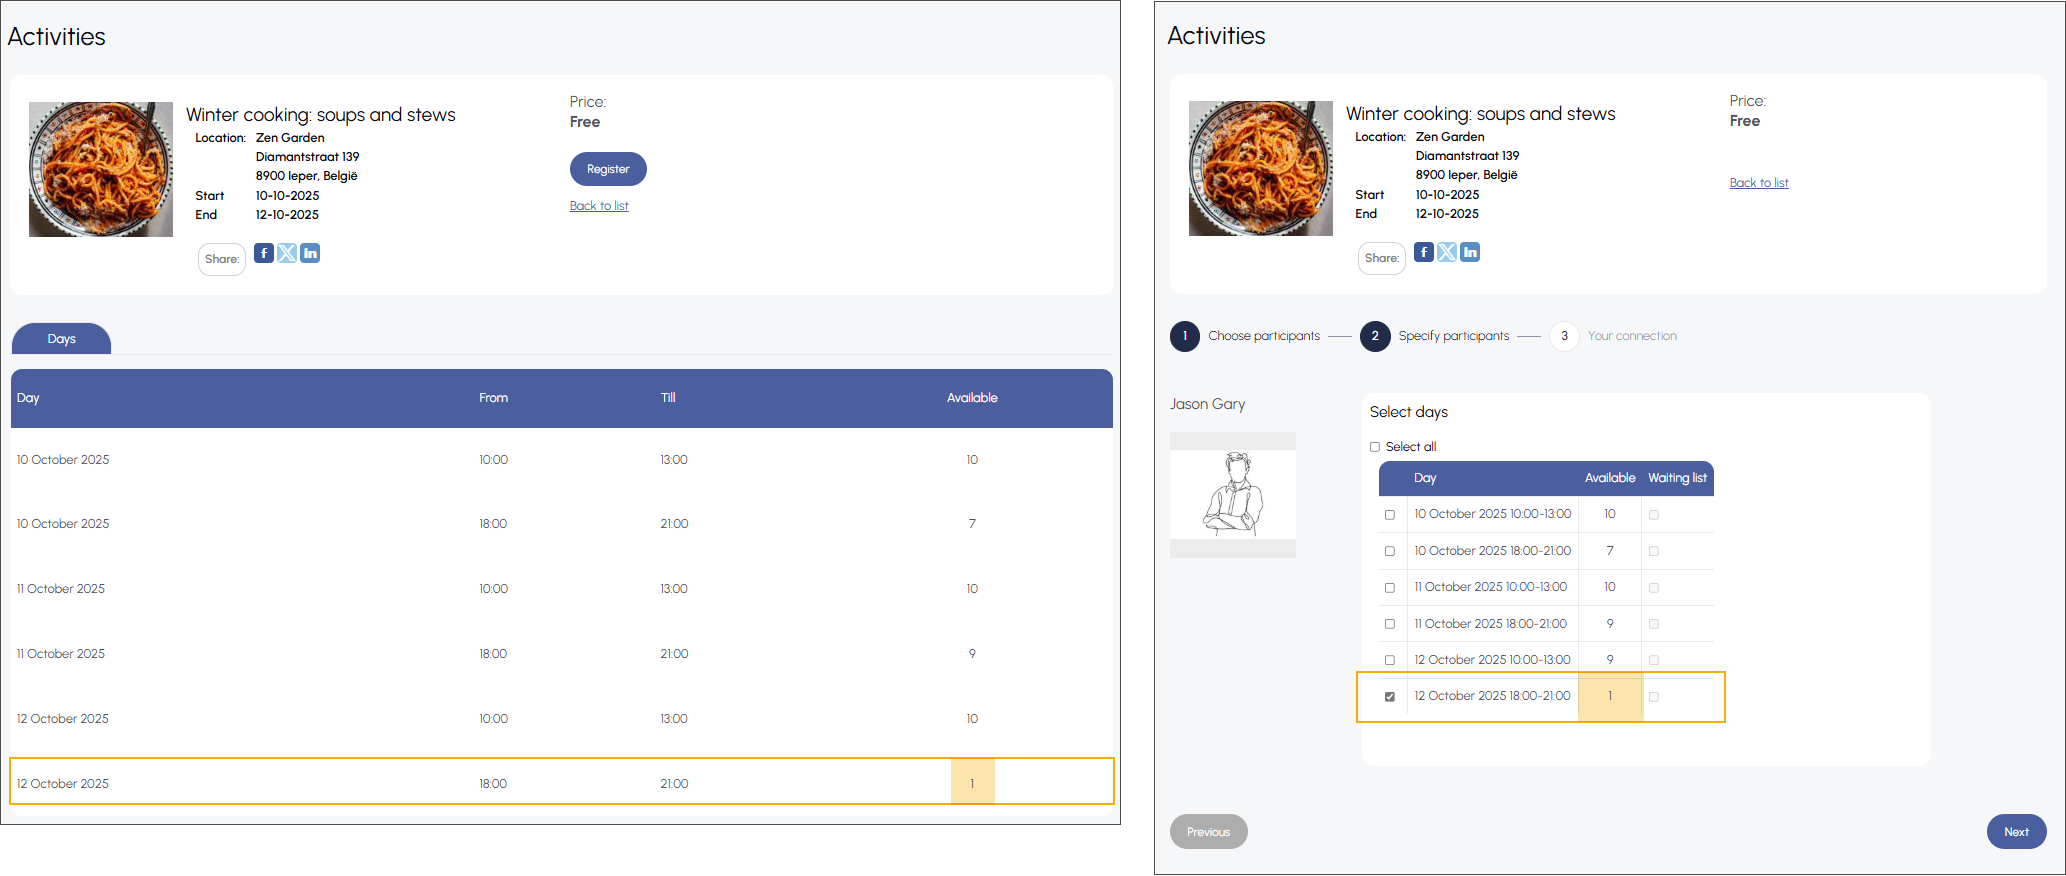
In this example, a counter (1) named Christmas events is configured with a total capacity of 15 visitors on the dates 10, 11, and 12 October from 18:00 to 21:00. An exhibition (2) and an activity (3), each with a maximum capacity of 10 participants, are linked to this counter and scheduled on the same dates and times.
On 10 October, there are 7 participants registered for the activity (1) and 7 visitors registered for the exhibition period (2), both linked to the same counter. Since the Christmas events counter allows a total of 15 visitors, the Remaining in counters value (3) shown in the backoffice is 1, indicating that only one more registration can be accepted across both offerings for that date.
When a customer registers for an activity via the webshop, they will see that only one spot remains available for that activity, based on the current counter status.
Registering more participants than allowed by the counter results in a blocking error.
Once the last available participant is registered, the counter is updated (1), and only waiting list registration (2) remains possible.
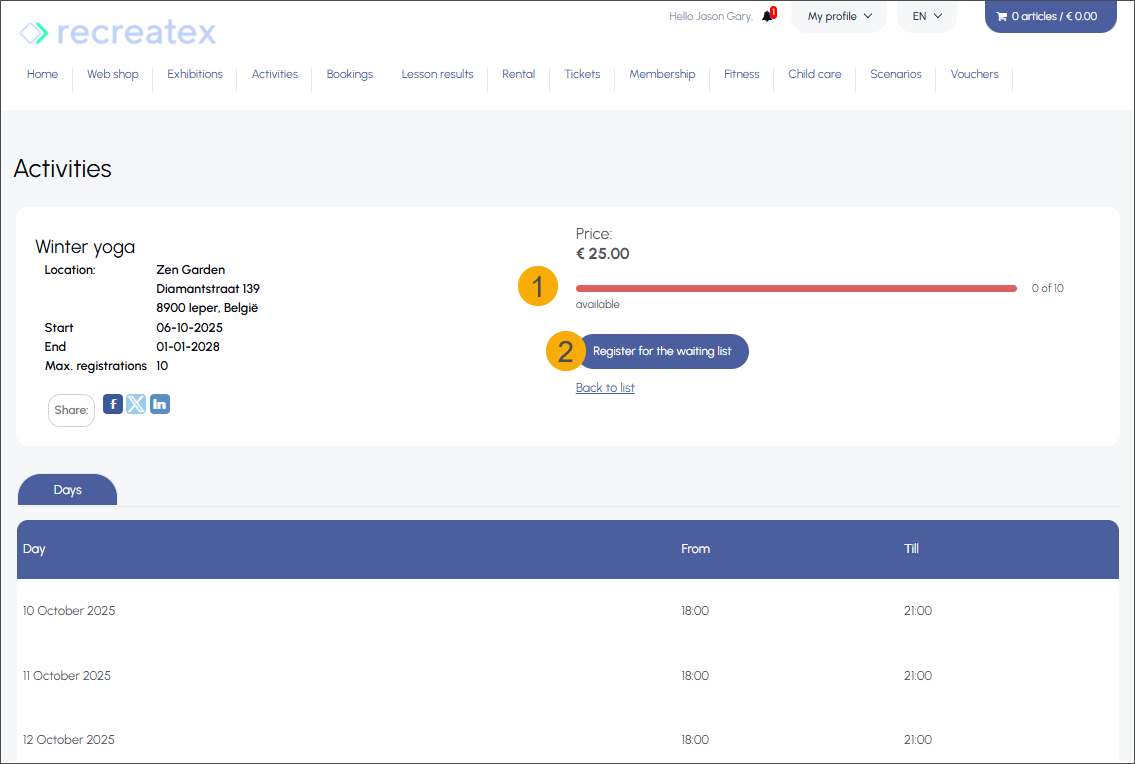
In the backoffice, the counter capacity is now 0 (1), with 8 participants registered for the activity (2) and 7 visitors booked for the exhibition period (3).
Although each event had a capacity of 10 participants/visitors, the shared counter ensured that the combined registrations across both the activity and the exhibition did not exceed the total limit of 15 visitors.
Registering at the activity day level
If an individual activity day or day part is part of a full counter, only that day or day part is considered fully booked.
The number of available places for an activity day or day part is the lowest of the following values:
The maximum number of participants set on the activity level
The remaining places on the linked counter(s) for that specific day/time
In this example, a counter (1) named Christmas events is configured with a total capacity of 15 visitors on the dates 10, 11, and 12 October from 18:00 to 21:00. An exhibition (2) and an activity (3), each with a maximum capacity of 10 participants, are linked to this counter and scheduled on the same dates and times.
On 12 October, there are 6 participants registered for the activity day part (1) and 8 visitors registered for the exhibition period (2), both linked to the same counter. Since the Christmas events counter allows a total of 15 visitors, the Remaining in counters value (3) shown in the backoffice is 1, indicating that only one more registration can be accepted across both offerings for that date and time.

When a customer registers for an activity via the webshop, they will see that only one spot remains available for that activity day part, based on the current counter status.
Once the last available participant is registered, the counter updates to show the label Full (1). Selecting that day part is no longer possible (2), and only registration for the waiting list is allowed (3).

In the backoffice, the counter capacity is now 0 (1), with 7 participants registered for the activity day part (2) and 8 visitors booked for the exhibition period (3).

Although each event had a capacity of 10 participants for 12 October from 18:00 to 21:00, the shared counter ensured that combined registrations across both the activity day part and the exhibition period did not exceed the total limit of 15 visitors.